Wireless Presenter Support
BlackBox Cue is compatible with wireless presenters (the kind used for PowerPoint presentations).
Enable the Remote checkbox, then use your presenter to control playback hands-free:
| Button | Action |
|---|---|
| Volume Down | Play the selected pad |
| Volume Up (short press) | Stop playback |
| Volume Up (long press >2s) | Advance to the next pad |
| Page Down | Select next pad |
| Page Up | Select previous pad |
| B key | Stop playback and advance to the next pad |
The selected pad is highlighted on screen. Navigation automatically switches pages when needed (in both directions).
Keyboard Shortcuts
BlackBox Cue supports keyboard shortcuts for quick playback control (active outside of Edit Mode):
| Key | Action |
|---|---|
| F1: F12 | Play pad 1--12 of the current page |
| 1 | Play SFX 1 |
| 2 | Play SFX 2 |
| Space | Stop playback |
| Page Up | Previous page |
| Page Down | Next page |
These shortcuts are disabled when typing in a text field or when a dialog is open.
MIDI
BlackBox Cue supports MIDI Input (control the software from a MIDI controller) and Control cues (send MIDI, OSC, or audio messages to external devices or to yourself during playback).
Enabling MIDI
- Check the MIDI checkbox in the main interface
- A dialog appears listing available MIDI devices in two sections:
- MIDI Input: choose a controller to pilot BlackBox Cue (keyboard, pad controller, etc.). Select a MIDI channel (Omni to listen on all channels, or a specific channel from 1 to 16)
- MIDI Output: choose a device to send MIDI cue events to (lighting console, DMX interface, etc.)
- Click SELECT to activate MIDI
You can select an input device only, an output device only, or both at the same time. Uncheck the MIDI checkbox to deactivate all MIDI.
A small indicator blinks next to the checkbox each time a MIDI message is received or sent.
MIDI Input - Controlling BlackBox Cue
| MIDI Message | Action |
|---|---|
| Note On 60 to 71 | Play pad 1 to 12 on the current page |
| Note On 72 to 96 | Select page 1 to 25 |
| Note On below 60 | Stop all playback |
| Program Change 1 to 25 | Select page 1 to 25 |
Page selection (via note or Program Change) also updates the current page for subsequent pad triggers.
Example Setup
With a standard MIDI keyboard:
- Use the C4 to B4 keys (notes 60-71) to trigger pads 1-12
- Use the C5 to C7 keys (notes 72-96) to switch pages
- Use any key below C4 to stop playback
- Send a Program Change to jump directly to a page
For control cues (MIDI, OSC, AUDIO, automation), see the Automation section.
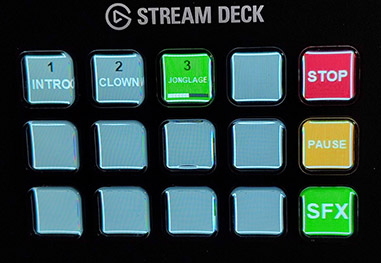
Stream Deck Support
BlackBox Cue supports the Elgato Stream Deck (15-key model) as a physical control surface.
Automatic Detection
When a project is open, BlackBox Cue periodically checks for a connected Stream Deck. When detected, the Enable Stream Deck checkbox and label appear. If the Stream Deck is disconnected, it reverts to "STREAM DECK NOT DETECTED" automatically.
Key Layout
The 15 keys are organized as follows:
| Col 1 | Col 2 | Col 3 | Col 4 | Col 5 | |
|---|---|---|---|---|---|
| Row 1 | Pad 1 | Pad 2 | Pad 3 | Pad 4 | STOP |
| Row 2 | Pad 5 | Pad 6 | Pad 7 | Pad 8 | PAUSE |
| Row 3 | Pad 9 | Pad 10 | Pad 11 | Pad 12 | PAGE |
- Pad keys display the pad number (in black, at the top) and the caption (in white, below)
- The currently playing pad is shown in green with a progress bar
- Empty pads are shown in grey
SFX and Page Modes
The bottom-right key cycles through three modes: Normal: SFX: Page: Normal.
| Key | Normal | SFX Mode | Page Mode |
|---|---|---|---|
| Key 5 (top right) | STOP | SFX 1 | P+ (next page) |
| Key 10 (middle right) | PAUSE | SFX 2 | P- (previous page) |
| Key 15 (bottom right) | SFX | PAGE | RETURN |
Tips
- Sleep prevention: BlackBox Cue automatically prevents your computer from going to sleep or turning off the screen while the application is running, so your show won't be interrupted.
- Continue mode: Use Continue mode across all your pads to create an automatic playlist that plays through your entire cue list.
- Crossfade + Continue: Combine crossfade with Continue mode for smooth transitions between tracks.
- Auto-Trim: Most audio files have a small amount of silence at the beginning. Auto-Trim detects this and skips it, so your cues start right on the sound. Silence longer than 10 seconds at the beginning or end of a track is considered intentional and will not be trimmed.
- Sequential cue lists without a timeline: You don't need a timeline or sequencer to run a scripted show. Simply set several consecutive pads to Continue mode, and the last pad of each sequence to One-Shot. When you trigger the first pad, the sequence plays through automatically and stops at the end. For the next scene, trigger the next pad (or switch to the next page) and start a new sequence. This approach is much easier to set up than programming timed cues on a timeline: anyone can do it, even without stage management experience. It also remains fully flexible: you can skip a cue, repeat one, or jump to any pad at any time during the show.